In the previous tutorial, I showed you how you can integrate MailChimp with the Slides Subscription Form the easy way. This includes setting up your MailChimp account, creating list, as well as customizing codes the MailChimp built-in subscription form to integrate with Slides Subscription form markup.
Today, we will look on how we can integrate MailChimp with the Slides Subscription form using predefined code and plugins. We will use jQuery and Ajax for this part to avoid any redirection and integrate verification with a smooth animation to improve the UX design of our Slide template.
Before we begin, it is assumed that you already purchased the Slides template so we don’t need to worry about the HTML and CSS.
What You Need:
- Slides template
- MailChimp account
- Font Awesome
- ajaxchimp.js
- Basic knowledge about HTML
- Basic knowledge about jQuery
Getting Started
Before we start, we need to create one extra file and download the jQuery.ajaxchimp.js plugin.
- css – For our custom styles on error and success messages (upload it inside the CSS folder of the Slides template)
- ajaxchimp.js – A jQuery plugin that lets you ajaxify your MailChimp form (upload it inside JS folder of the Slides template)
Note: We will need to add these CSS and JS files to index.html file just before the closing </head> tag by opening it inside the Slides template folder. Copy the codes below.
<link rel="stylesheet" href="css/custom.css" name="custom-styles">
<script src="js/ jquery.ajaxchimp.js "></script>
Getting the MailChimp Subscriber’s list URL
Login to your MailChimp account or sign up here if you don’t have one.
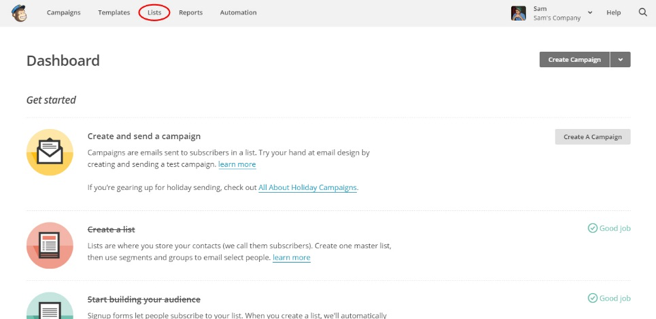
To get the MailChimp’s subscriber’s list URL, go to your dashboard and then click the “Lists” link on the top navigation. This dashboard handles the list of your subscribers.
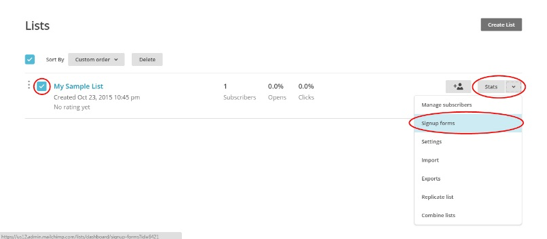
Next, under Lists dashboard, select the list where you would like the subscribers to be listed upon subscription and then on the right side of the screen, click the “Stats” dropdown menu and select “Signup Forms.“
The Form Option window of the selected list will open so from there select “Embedded forms” and click the “Select” button on the right side of the screen.
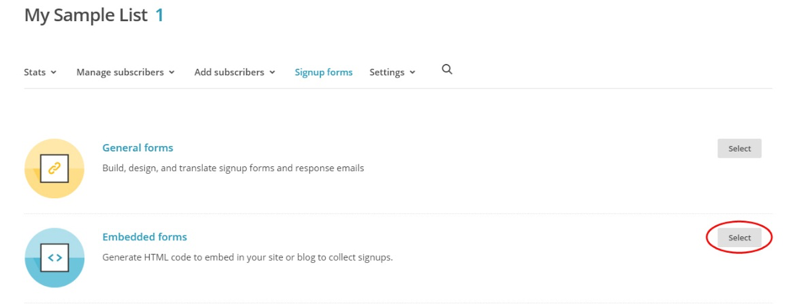
I already discussed in my previous tutorial that there are four available options that you can select under Embedded Forms. This time, we will select the “Super Slim” option as we will only need the Subscriber’s list URL.
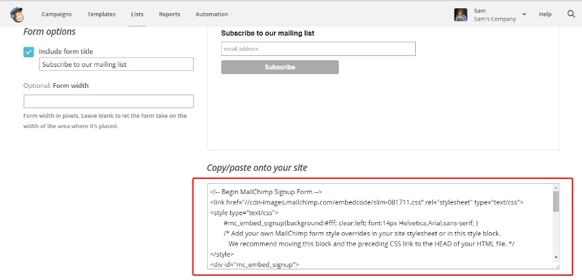
You can then copy the generated embedded code on the embed code box on right side of the screen on a notepad but we will only be taking this link here. This is our Subscriber’s list URL.
The Form Markup
Our original markup for our form contains the code below.
<form action="#" autocomplete="off" class="ae-4">
  <input type="email" class="rounded input-38" name="email" placeholder="Email"/>
  <input type="submit" class="button pink uppercase rounded" name="name" placeholder="Name" value="Get Updates"/>
</form>
Now, let’s customize some attribute names and add classes. We will also put a <label> tag with a class .subscribe-message for our success and error message. Below is the final markup for our form. Copy this form markup and replace the Slides default form markup.
<form id="subscribe" class="ae-4">
  <input type="email" value="" name="subscribe-email" id="subscribe-email" placeholder="Your e-mail" class="rounded input-38"/>

  <input type="submit" value="Get Updates" name="subscribe-submit" class="button pink uppercase rounded"/>
  <label for="subscribe-email" class="subscribe-message"></label>
</form>
Working with jQuery
Next, we need to add the following JavaScript code which will handle the verification and set up for the Subscriber’s list URL of our subscription form via jquery.ajaxchimp.js.
Add the following code inside a <script> tag. Place it before the closing </head> tag.
     $(function(){
            $('#subscribe').ajaxChimp({
              url: 'http://designmodo.us4.list-manage.com/subscribe/post?u=d7b5474e1bff23f08409d4ba9&id=a2ae53acc1'
            });
          });
Using the subscribe id we’re going to call the ajaxchimp callback to set up the subscriber’s list URL and the rest will be handled by the plugin. This will include email validation and checking on the subscriber’s list in real time.
Custom Styles
Finally we will add a few lines of styles for our error and success messages. Open up custom.css file and then copy the code below.
     .subscribe-message {
     display: block;
     font-family: "Source Sans Pro", sans-serif;
     font-size: 20px;
     max-width:509px;
     margin:0 auto;
     border-radius:4px;

/* animation */
     -webkit-transform:scale(0);
     transform:scale(0);
     opacity:0;
     max-height:0;
     padding:0;
     border-width:0;
     -webkit-transition:0.5s;
     transition:0.5s;
     }
     .subscribe-message a { font-weight:600; }
     .subscribe-message.valid,
     .subscribe-message.error {
     -webkit-transform:scale(1);
     transform:scale(1);
     max-height:132px;
     opacity:1;
     padding:14px 20px;
     }
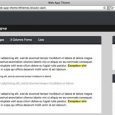
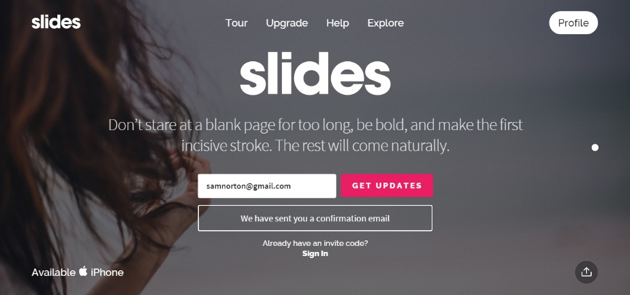
So if you are going to test this in your browser and put a valid email in the text box, there will be no redirection. Instead, you’ll be prompted with the same screen with the success message.
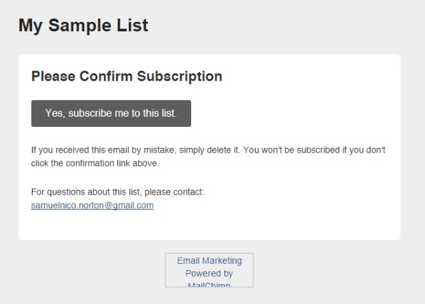
For you to confirm your subscription, you will be receive an email about this action. Click the “Yes, subscribe me to the list” button to confirm your subscription.
You can download the source files here.
Wrapping Up
In this article, you learned how to integrate jQuery and Ajax to enable the MailChimp subscription list link without redirection.
While you can still use the redirection process from my previous tutorial, AjaxChimp is really helpful if you hate the jarring transition to the MailChimp website after submitting an email address to MailChimp. This adds more value to your website since it’s not killing your UX design.
Ajax is rapidly becoming an integral part of websites due to its better interactivity, easier navigation and compact code system which is backed by reputed brands. This gives us a sort of providing better user experience just like we did on this tutorial.
I hope you enjoyed this tutorial, please feel free to leave any questions, suggestions or comments in the comment section.