Google recently announced that it has started using HTTPS as a ranking signal. And that has implications for your site and whether it uses an HTTP or HTTPS protocol.
For now, it’s only a very lightweight signal affecting fewer than 1 percent of global search queries, and carrying less weight than other signals (such as high-quality content) in order to give website owners time to switch to HTTPS.
In this article, we will take a look at the meaning and difference between SSL and HTTPS, how to install and activate an SSL certificate and how to move WordPress from using the insecure HTTP communications protocol to HTTPS.
SSL vs HTTPS
SSL, Secure Sockets Layer, is the standard security technology for establishing an encrypted link between a web server and a browser. This link ensures that all data passed between the web server and browsers remain private and integral in order to prevent eavesdropping and tampering.
HTTPS on the hand is a URI scheme which has identical syntax to the standard HTTP scheme, aside from its scheme token. However, HTTPS signals the browser to use an added encryption layer of SSL to protect the traffic.

In a nutshell, SSL is the standard that defines how connections are encrypted via HTTPS.
How SSL Works
Typically an SSL certificate will contain your domain name, company name, address, city, state and country. It will also contain the expiration date of the certificate and details about the certification authority responsible for the issuance of the certificate.
When a browser connects to a secure site it will retrieve the site’s SSL certificate and check that it has not expired, it has been issued by a certification authority the browser trusts, and that it is being used by the website for which it has been issued. If it fails on any one of these checks the browser will display a warning to the end-user letting them know that the site is not secured by SSL.
Difference Between HTTP and HTTPS
There are lots of criteria that differentiate one from the other. In my opinion, the three listed below are the major differences between HTTP and HTTPS.
- URL Scheme: HTTPS URLs begin with
https://and use port 443 by default, whereas HTTP URLs begin withhttp://and use port 80 by default. - Security: HTTP is insecure and is subject to eavesdropping attacks, which can let attackers gain access to sensitive information of a website whilst HTTPS is designed to withstand and secure against such attacks.
- Network layers: HTTP operates at the highest layer of the TCP/IP model which is the Application layer.
SSL security protocol operates as a lower sub-layer of the same TCP/IP model but it encrypts an HTTP message prior to transmission and decrypts it upon arrival. Thus, HTTPS is not a separate protocol, but refers to use of ordinary HTTP over an encrypted SSL connection.
Why Use HTTPS?
HTTPS is especially important over unencrypted networks (such as Wi-Fi), as anyone on the same local network can “packet sniff” and discover sensitive information.
How many times have you accessed a site on an open network and got unexpected ads?
When you serve your website content securely via HTTPS, you are guarantee that nobody will alter how they are received by users. If you’re serious about doing business online, you need SSL. It’s the best way to protect user data and defend against identity theft.
Many customers will refuse to do business with a website that doesn’t have an SSL certificate. Displaying your SSL Site Seal tells customers they can shop or use a website with confidence, knowing they are protected.
Moving WordPress from http to https
To make a website HTTPS, firstly get an SSL certificate for the domain, install it on the server and change the website permalinks from http to https.
A lot of WordPress sites are on shared-hosting servers with cPanel provided as the control panel hence a shared-hosting will be use as the base of this tutorial. If your website is on a dedicated server or VPS, this tutorial is still applicable but the process on getting it done varies with servers.
To follow along with this tutorial, ensure your shared-hosting has SSL/TLS activated. If absent, contact your host and request it. They might charge to activate it.
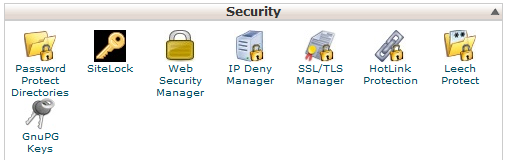
To check if it is activated, login to cPanel and you should see an SSL/TLS manager under the Security widget.
Getting an SSL Certificate
There are various kinds of SSL certificates. They are basically categorized into three groups: Domain Validation, Organization Validation and Extended Validation.
- Domain-level validation is the most basic type of SSL and are generally the least expensive.
These certificates provide basic encryption, are issued very quickly and involve a simple check to verify domain ownership. - Organization-validated SSL certificates include authentication of the business or organization behind the domain. This provides a higher level of security and lets customers know they can trust your server with their personal information.
- Extended validation is top of the line. With extended validation, the certifying authority conducts a very in-depth examination of your business before issuing the certificate. This type of SSL provides the highest degree of security and user trust.
Here is a guide from Namecheap on what SSL certificate to choose.
There are lots of companies selling SSL Certificates online, such as SSLs.com, Media Temple, GoDaddy, Comodo and Namecheap.
How to Activate an SSL Certificate
Note: I bought my SSL certificate from Namecheap but the instructions remain valid regardless of the company you bought your SSL from.
The first step in activation of SSL certificate should be obtaining CSR code from your hosting company. To obtain the CSR code from an SSL activated shared-hosting account, follow the steps below:
1. Login to your cPanel account and navigate to the SSL/TLS Manager.
2. Click on the link below Certificate Signing Requests (CSR)

3. Fill out the form for the domain that you wish to create the SSL on and click the Generate button.
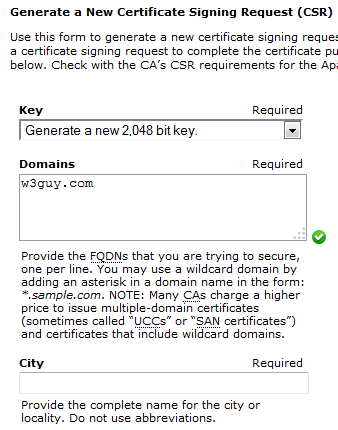
4. Your domain Encoded CSR should be generated and shown to you.
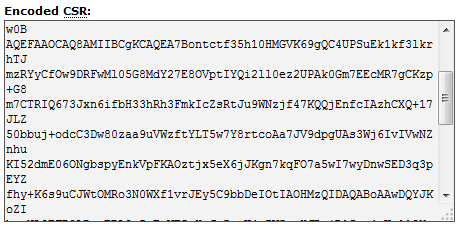
5. Head over to your SSL provider to get started with SSL activation. Enter the CSR code generated above in the provided CSR text area field, select the web-server your host is running on and click the Next button.
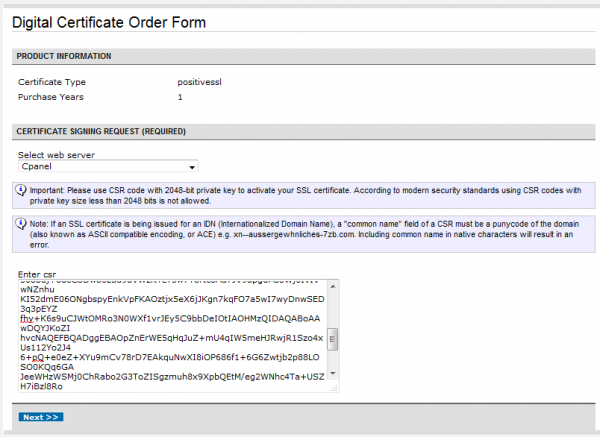
6. You will be prompted to enter your CSR information and to choose an approval email.
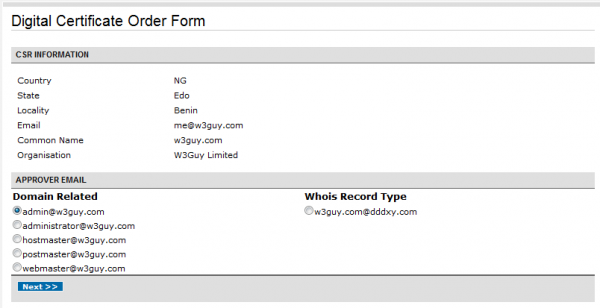
7. Provide your personal contact details. When done, submit the order. An approval email will be sent. Follow the instructions to validate your domain.
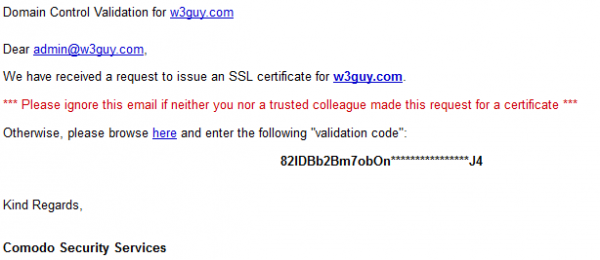
On completion of the validation, your SSL would be issued and sent to your email.
We need to get the SSL issued to you installed on your server. A dedicated IP address is required to be assigned to your cPanel account. If you cannot afford one, most cPanel hosting support Server Name Indication (SNI) – an extension to the TLS protocol that allows a server to present multiple certificates on the same IP address and port number and hence allows multiple secure (HTTPS) websites.
Since the shared-hosting am using for my WordPress blog supports SNI, I decided to use it instead of buying a dedicated IP.
Note: There are several advantages of using a dedicated IP address over SNI. See this article for more information.
To install the SSL certificate, follow the guide below:
1. At cPanel SSL/TLS Manager, click the link beneath Certificates (CRT)

2. Upload the certificate (with .crt file extension) or past the certificate in the text area provided.

3. Activate the SSL for your site. Click on the link under Install and Manage SSL for your site (HTTPS).
4. Select the domain from the drop-down list, click the Autofill by domain and finally click the Install Certificate button.

Configuring WordPress for SSL/HTTPS
Links in WordPress (such as image attachments, themes CSS and JavaScript files) are relative to the install URL.
To change WordPress from HTTP to HTTPS, the install URL must changed from say https://designmodo.com to https://designmodo.com.
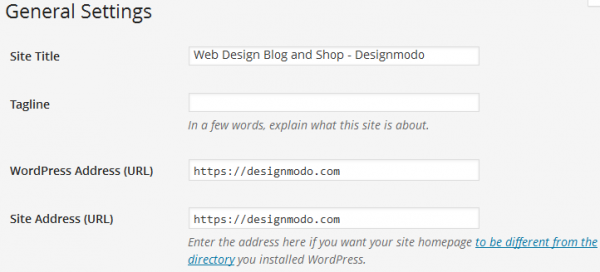
- Login to your WordPress dashboard and navigate to Settings > General.
- Ensure that the WordPress Address (URL) and Site Address (URL) are
https. If not, addSafter http to makehttpsand save it.
To easily enable (and enforce) WordPress administration over SSL, the constant FORCE_SSL_ADMIN should be set to true in your site’s wp-config.php file to force all logins and all admin sessions to happen over SSL.
define('FORCE_SSL_ADMIN', true);
The constant FORCE_SSL_ADMIN can be set to true to force all logins and all admin sessions to happen over SSL.
If your WordPress site uses a content delivery network (CDN) to serve its components (images, JavaScript, CSS style sheet), ensure the URLs are all https:// otherwise your website will be deem insecure by the web browser.
What’s Next?
Now that we’ve successfully moved WordPress to HTTPS, we still need to do two more things — set up a 301 permanent redirect and inform Google of the URL change.
To setup a 301 permanent redirect, FTP/SFTP to your server and add the code below at the top of WordPress’ .htaccess file.
RewriteEngine on
RewriteCond %{HTTP_HOST} ^yoursite.com [NC,OR]
RewriteCond %{HTTP_HOST} ^www.yoursite.com [NC]
RewriteRule ^(.*)$ https://www.yoursite.com/$1 [L,R=301,NC]
Change every instance of yoursite.com to your WordPress URL.
To inform Google about the change in URL, re-add your WordPress site to Google webmaster tool (but this time with https://) and follow this this guide to let Google know about the change of URL.
You can check your SSL website status using Qualys SSL Labs.
Summary
By completing this tutorial, you should have a comprehensive knowledge on HTTPS and SSL, reasons why should make your site secure and how to set up SSL/HTTPS in WordPress. If you have any questions, suggestions or contributions, I would be happy to answer them in the comments.


45 Comments